Learn the Basic Concept of Adobe Illustrator
What is illustration?
If anyone talks about the Illustration concept as related to a demonstration, anyone can find the visible picture of that content. In the world of media, instead of print media or web media, any content, books, products, etc, need to be illustrations. So, Illustration is a useful designer tool or app and is frequently used daily by professionals or students.
What is Adobe illustrator?
Adobe Illustrator is an application or program that supports, draws, and presents particular point-to-point creativity to draw an image on the computer. It was launched in 1987 by Adobe Inc.
How to Download Adobe illustrator?
For the use of Illustration, anyone should be it download from the different websites that are offered free of cost such as ;
- https://filehippo.com/download_adobe-illustrator/
- https://fixthephoto.com/adobe-illustrator-free-download-for-windows-10.html
- https://en.downloadastro.com
It is also downloaded by the google play store.
Adobe illustrator Different Usage
Adobe Illustrator can be used for earning purposes. Because this program offers different creativity styles with it different templet styles. Such as ;
- Company Cards and Logos
- Flyers
- Brochure design
- Menu design
- Posts for mobile and websites
- Sketches
How To Start Adobe illustrator?
After downloading Adobe Illustrator to your computer or device user should be open the program.
- So the screen appears like this.
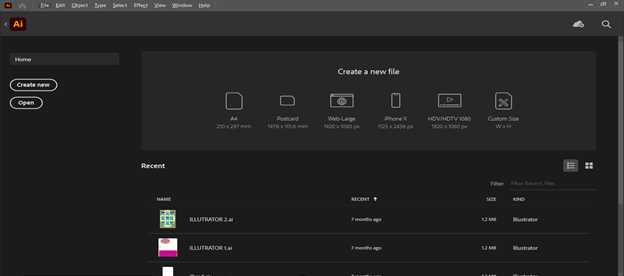
- Under the title Create a new file, the user can create or open a template or file like A4, postcard, web-large, etc.
- If select the A4 and click on it, the new window opens like this.
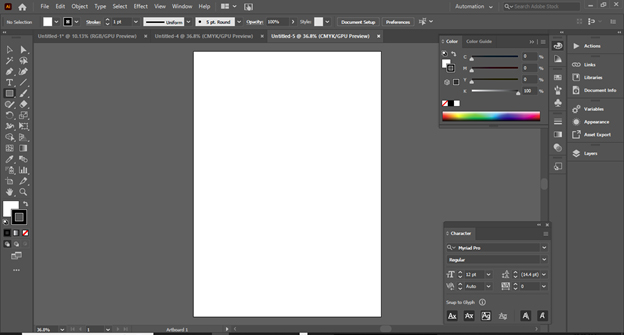
- It is the main page of Adobe Illustrator, so the creator can create his design according to his needs.
Explanation of Toll Bar of Adobe illustrator
At the left corner of the work page of Illustrator, the user can find the two rows of tools that have started from two arrows and the ending with three dots (…) like this.
These tools help create and draw imaginative pictures or import sketches from websites.
- Selection Tool
- Rectangle Tool
- Color Direction
Selection Tool

- When anyone clicks on the left side of the panel or the first arrow of the row. It is open to work and called a Selection tool.
- This tool is helpful for the selection of the file of a specific image.
- For every object that has been drawn and wants to be colored, first, the creator selects it after clicking on the Selection Tool and then moves on to the next step.
- For example, click on the rectangle tool, which is placed on the 5th number of the first row, and draw on the file.
- It will be drawn as the designer desired size, now click on the selection tool and then select the shape.
- The shape is ready for color.

- Now click on Fill(X)
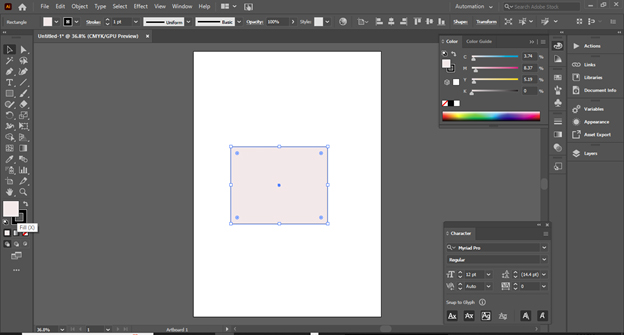
- Now the color panel is open like this, select the desired color and thus click on OK.

- The desired color will show on the image.

- Like this, the newbie can practice easily from one diagram to more.
Rectangle Tool
For the newbie creator is appropriate to know about the easy-to-advanced tool, so now learn about the Rectangle tool. When the creator clicks on the Rectangle tool corner, then found more images or shapes tools such as;
- Rectangle Tool
- Rounded Rectangle Tool
- Elipse Tool
- Polygone Tool
- Star Tool
- Flare Tool
Use of the Rectangle Tool
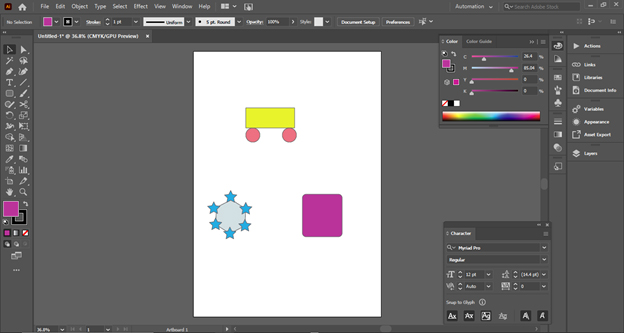
Rectangle tools can be used to draw desired shapes and sizes. For this purpose, designers should be used carefully and creatively. If the creator clicks one by one each and every shape, he will draw a simple image.
- First, hold and click on the Rectangle tool corner and click on the desired tool, such as Elipse Tool.
- After creating the image, if it needs to be moved to the desired place, must be clicked on the Selection Tool.
- So the image can be selected simply and moved according to the cursor or mouse.
- When the drawing is complete, thus the creator can fill the color according to the previous direction. So the simple images can look like this.
Color Direction
Before the newbie knows more, he wants to know about the Color Tool.
- It is ranked on the first row and the 15th number of the tool.
- There are mentioned two boxes with the color and top of it, anyone can see the two rounded arrows image.
- It is made of creator puzzles who look at two boxes of color.
- The dominant box is called Fill(X) and helps to fill the color of any image and shape.
- The lower and below box is called Stroke (X).
- When clicking on both boxes, the tool name is present also.
- The Stroke gives color to the image outline and boundary of it. So the creator can change the color according to the image color needs and the designer’s wish.
Role of Arrow
The role of the arrow may be critical if the creator does not know about the usage of it.
- If the creator clicks on the Fill (X) side arrow, the color of this box transfer into the stroke box.
- If the creator clicks on Stroke (X) side arrow, so the color of this box will change from the Fill (X).
- So the colors can be manipulated by the use of these arrows easily, simply, and quickly.
Some tricks for practicing the pictures
If anyone has no idea how to create a picture with the help of a shape tool. That’s simple, research and search. Try or type shapes-related keywords on the Google Search Engine and find the various applicable shapes on Illustration.
Conclusion
Adobe illustrator is a tool for designing and creating imaginative ideas. It is not enough complex and not simple. But it needs to be practice and time. If anyone takes time for it program so they can learn easily basic to mastery. When a designer does create his own unique and charming design in different areas of Adobe Illustrator. At that time, he can share his creative work on social media and other platforms and will earn money at that moment.


